


This page will give you the necessary support and instruction in order to use this app. Click on a section to better understand each function of this app. Click on first picture of the gallery under each section in order to see a screen by screen description. Please note instructions for Exam Page will be found on separate page.
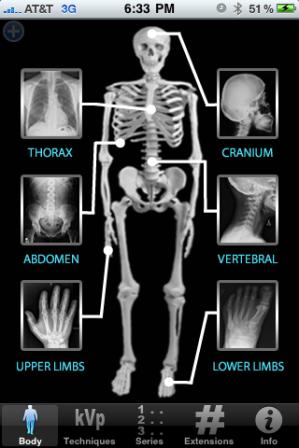
From this screen and all other sections of this app you will be able to jump from one portion or section to the others using the icons located at the bottom of the screen. On this page you are presented with a skeleton surrounded by individual icons. This is the starting point in finding your desired exam. For instance if you choose and select the Thorax you are then presented with a list of sub-categories (Chest, Sternum, and Ribs). As you continue through this hierarchy you may choose one of these sub-categories and are presented with yet another list. This list is where you will find your desired exam and the informational part of the app (exam instructions).
BODY or HOME SCREEN :


INSTRUCTIONS
EXTENSIONS PAGE:
This section of the app is very unique and exciting. Radiology techs deal with every aspect of the hospital. Wether it be the E.R., ICU, Medical or Surgical Floors, Lab, or even individual Doctors the are just too many extensions to remember. Consider the extensions page your own contact section just for your work. This section requires you to enter the first six numbers of your hospitals telephone number from the setting icon for the iPhone. You will find an icon labeled RadX Mobile in your list of apps with settings options. Once you select RadX Mobile you will be asked to enter a "Base number". Here is where you will enter the area code and first three numbers for the hospital and you are set to use this section in the app. At this point upon entering this section within the app itself you are able to tap on the input box labeled "Dial extension directly" and enter any four digit extension with in the hospital. You will see the option to "Call/Text" select "Call" and your phone will immediately start dialing that extension! You are able to save individual extensions in this screen as well. Simply choose edit, enter the number and label for your extension, and save it.
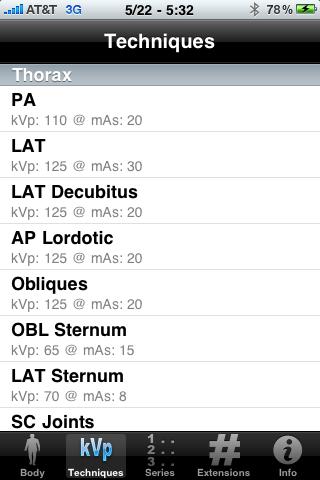
TECHNIQUES PAGE:
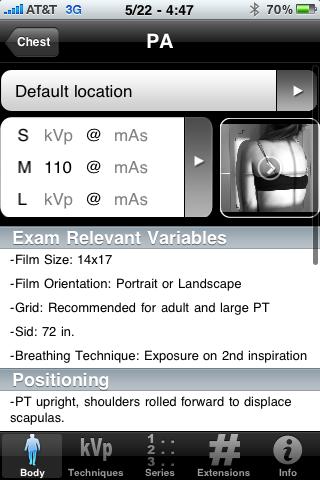
This portion of the app serves as a quick guide to individual exams and their techniques. Upon the user entering a technique for a given exam, within a medium size patient slot (see instructions for Exam page), this user entered variable will be stored into this portion of the app. In other words, if all you want in using the app is to seek the appropriate technique for a given exam, this portion of the app is designed just for that. For each exam that you modify the "M" or Medium slot, these values are the exact values that will be displayed in this portion. These same values can be seen when accessing an exam from the main menu (Body Screen).
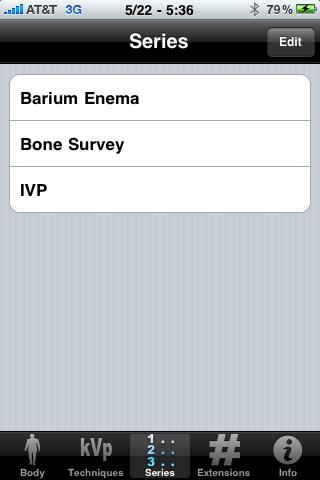
SERIES SCREEN:
The series section of the app allows the user to group together individual exams into a particular "series". The series name is also defined by the user in this section. For example you may choose to make a series called "Hand". The protocol for your hospital may be as such: PA Hand, OBL Hand, and LAT Hand. Though this is a simple example series such as bone surveys or barium enemas may prove more difficult to remember. Enter this section by selecting the "Series" button from the bottom of the screen. When first entering this section you will have but one option, to select edit on the top right side of the screen. This will allow you to make a new series and name it as you wish. After assigning a title to your new series select the button labeled "Done". Next select your newly created series. Select "Edit" again. From here you are able to start adding your individual exams. You will be presented with a small green plus sign. Proceed by selecting this icon. You will then be given the option to add and exam from and existing exam or custom exam. At this point RadX Mobile does not have every exam available so you can add an exam title by creating a custom exam. For exams that are included in the app you can choose from existing exams. By choosing this option you will discover a rolodex style hierarchy selection tool. Start in the "Body parts" tab located at the bottom of the page and scroll through the rolodex to find the appropriate part of the body you would expect to find the desired exam for this series. If you were looking to create a hand series and wanted to add the PA Hand roll through the options until you find and highlight "Upper Limbs". Move to the categories tab and find and highlight "Hand." Finally move to the final tab and find "PA Hand" and hit the "Select" button. Repeat these steps as necessary.
SmartMed Apps


 sign to begin the selection process.")


 icon.")